Support The Site

Tuesday, December 5

Not Show Compensation Plan In MSS

In creating compensation plans inside Enterprise Compensation Management, the main need of it is to have it available in the MSS Compensation Tool for managers to use and plan against. However, at times there are needs not to display the compensation plan in MSS and only use it via infotype 0759 by the HR department.


This tip was shown to me by an Anonymous Towers Perrin consultant (person perfer to remain anonymous). To do this is actually very easy and it does explain in the SAP help document (which I had overlooked).

What first need to be done is create a separated compensation review period and attach all compensation plans you wish NOT to show in MSS compensation planning screen to it.


SPRO -> Personnel Management -> Enterprise Compensation Management -> Compensation Administration -> Compensation Plans and Reviews -> "Define Compensation Reviews"


As you can see from the screen above, this is the configuration screen for Compensation Review. You normally would have one where you would attach MERIT compensation plans and/or BONUS, etc to.

In the case of certain compensation plans not wanting to be display in MSS, you simplity would need to not specify any dates in the "Review Period". See help documents below.


As you can see in the verbiages, it said "...to define a period during which the line manager is allowed to process a compensation review in Manager Self-Service". By not specifying a review period, you are NOT allowing the line manager to process the compensation plan in MSS, as the result it is not visible to them to select.

This is extremely useful in situation where HR has certain compensation plans restricted to certain individual where they would prefer it be administer via IT0759, rather through MSS.

Outstanding little trick!

(If anyone else has any goodies and would like to share it, drop me an email explaining it and I'll post it. Do also specify if you prefer to be anonymous or have your name to the credit.)

Friday, November 24

Easily Produce PDF Documents From Any SAP Reports

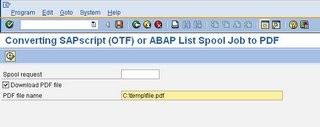
There is a little known program available in SAP that will assist you in producing Adobe PDF output in most "standard" and "customized" SAP reports. The program is called "Converting SAPScript(OFT) or ABAP List Spool Job To PDF". You have to access it via transaction "SE38" or "SE80" using the program name "RSTXPDFT4".

As you can see from the screenshot above, this is a fairly simple program to use. All you have to do is provide it a spool request ID.

Example:


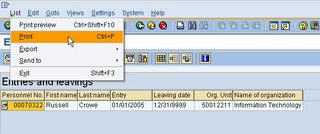
I will use the standard SAP delivered program "Entries and Leaves" (transaction: S_PH9_46000223 - EEs Entered and Left). Upon executing this transaction, I will get an ALV format output. Normally I would export this to MS Excel, however let say I would like to produce a PDF format instead.
From the menu bar, I would select List -> Print


Upon printing, you will receive at the bottom of the screen a "Spool Request"


Using the spool request number, you would enter it into the program and execute. It is that simple!


Monday, October 23

Configure ECM Planning Columns In MSS

I recently muck with a new piece of configuration involving MSS portal screen for ECM 5.0 which is pretty interesting. You could read more about it from SAP help document (HERE).
(Note: You need an OSS ID and LOGIN to access the document from SAP)

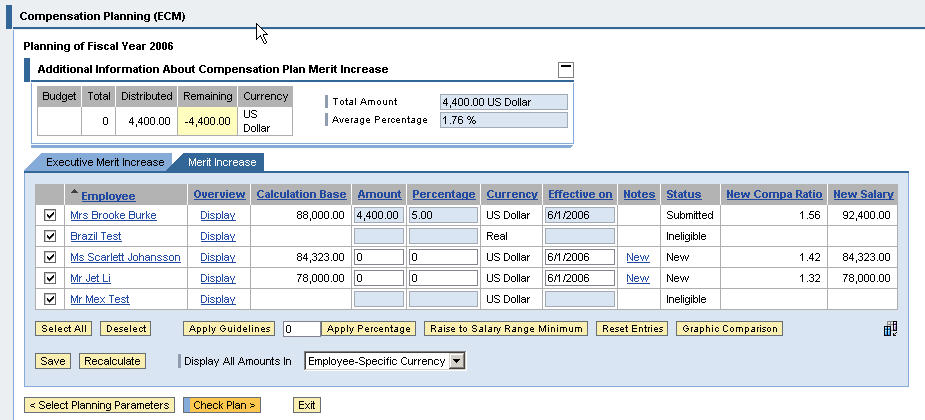
This walkthru is intended to show you at a high level what is involved. Let's start with the MSS portal screen of the ECM 5.0. As you can see (below) the MSS portal screen consist of several columns. These columns is a configuration item on the R/3 side.


You could add columns, remove columns, and/or even define your own custom columns. The define custom column piece will be mentioned here, however will not go into detail.

In SAP R/3 system, we will look at the IMG node

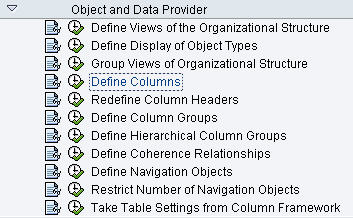
SPRO -> Integration With Other SAP Components -> Business Packages / Functional Packages -> Manager Self Service (mySAP ERP) -> Object and Data Provider

We will focus our configuration in this particular IMG area. We will not use all of the pieces in here.


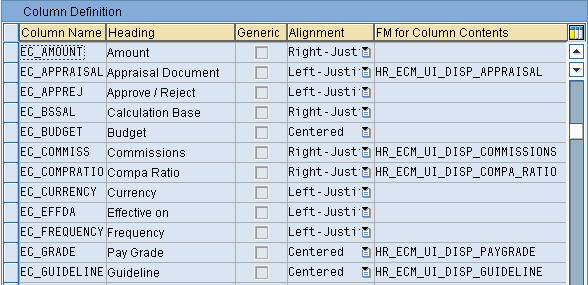
Let's start with "Define Columns". In the "Define Columns" (table: V_TWPC_COL_ERP), you will be listing all the possible columns to-be used by the MSS screen. It is in this particular area where you will define any custom columns you wish to define as well and link them to custom function module that will lookup the information needed to pass back to the column.

As you can see from the image above, you have Column Name, Heading, Alignment, and FM for Columns Contents. In the "FM for Column Contents" is where you specify the custom function module for the custom columns. SAP delivers a lot of standard column for ECM 5.0, you should look through them first to see if it exist prior to creating your own.

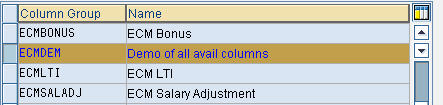
In the "Define Column Group", you have two pieces to configure. The first one is "Define Column Groups" (table: V_TWPC_ARRAYTP) and the second one is "Assign Columns To A Column Group" (table: V_TWPC_ACOL_C or V_TWPC_ACOL). In the "Define Column Groups" you will define the name where you will group all of these columns in earlier step together. In our example, we will call it as ECMDEM.


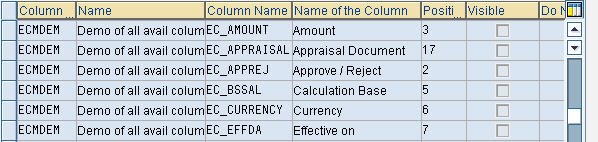
In the second section, "Assign Columns To A Column Group" is where you link all of the columns you've identify to the column group you gave the name to earlier (ECMDEM).


As you can see from the image above, ECMDEM column group has 6 columns (in actual table there are more, but screenshot has been cropped for blog). The position column shown above determine the position of the column from left to right. The "Visible" column forced the column to be visible and can not be hide from the USER profile in MSS. The next column you don't see is called "DO NOT DISPLAY", this will totally hide the column. The last column you need to know is "Invisible". Which allow the USER Profile in MSS to hide the column at the user level.

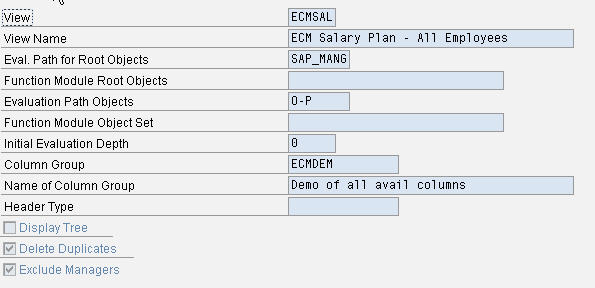
The last piece of config on the R/3 side is "View Definition" (table V_TWPC_V). I am not sure where this is located on the IMG step, I've always go to the table directly. This table specify what column group to use on the MSS portal side. The view name is what is used on the portal iview configuration.


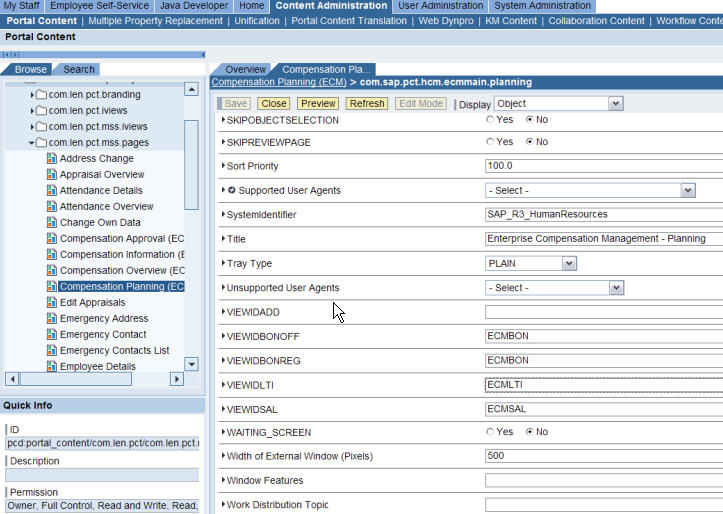
The "View" field will be used on the portal content adminstration side. This is what you tell your portal administrator to reference the iview from. See sample portal content administration screen below.


Now you've completed a simple walkthru on how to quickly modify columns for MSS ECM 5.0 screen. Chances are you might have access to do the R/3 configuration, however you would need to work with the portal team on modifying the portal iview to specify the proper view name.

A couple of things you need to know and remember. First is some of these fields are considered as dynamic driven fields. Such as Compa Ratio, New Base Salary, etc. In order for these fields to properly work, a setting need to occur. Second is there are limitation to how many columns you could display. While you have more shown on the R/3 table configuration, there is a max of how many could be show on the portal screen. The MSS User would need to de-select which of those they don't care to show and select those they care to show. Please refer to main SAP HELP document (link provided top of blog) for further information. Otherwise, you will be scratching your head for days trying to figure out why there are no data showing in these fields.

Lastly, from what I've gathered, ECM in later version after 5.0 have slight changes to how the portal screen look like. As the result, this method might not be correct for later version. Please refer to their documents for further details.

Ciao!
KN

P.S. check out other SAP documents I've written @ http://www.saphelpbykevin.com

Tuesday, October 17

Part II: SAP Job Pricing & Job Survey

Continuing from Part I previously posted (HERE).

Section III: Job Matching
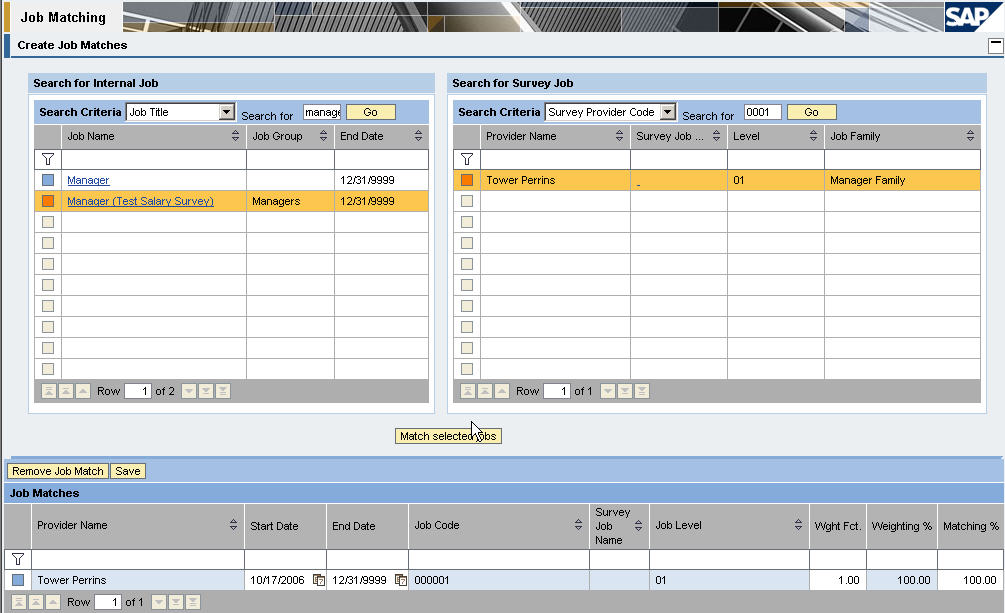
- In this section you will be matching up internal benchmarked jobs against the survey job you've recently imported.
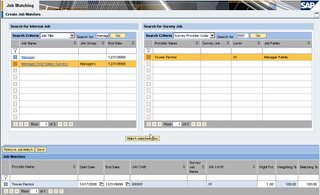

On the left column, you will need to select the SAP JOB to match up against the JOB you've uploaded previously from the provider. Once you selected them, click on the "Match Selected Job" button. At the bottom, you will do the weighting factor and matching factor. This determine of what % the job survey data will be used to weight against your internal job to be used for aging later.

For example, you have a software engineer job and you received data from two separated provider. One from Tower Perrins and one from Mercer both containing benchmark data for Software Engineer. In this step, you could specify the weighting factor from Tower Perrins only be 40% and the Mercer matchup is 60%. When you do the composite result in later step, it will take that into account.

Section IV: Aging
- At this step, you will age the market data imported earlier


Section V: Composite Result By Internal Job
- You are creating a result report against internal jobs and compare it against your employee salary or the salary structure they hold.
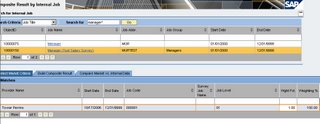

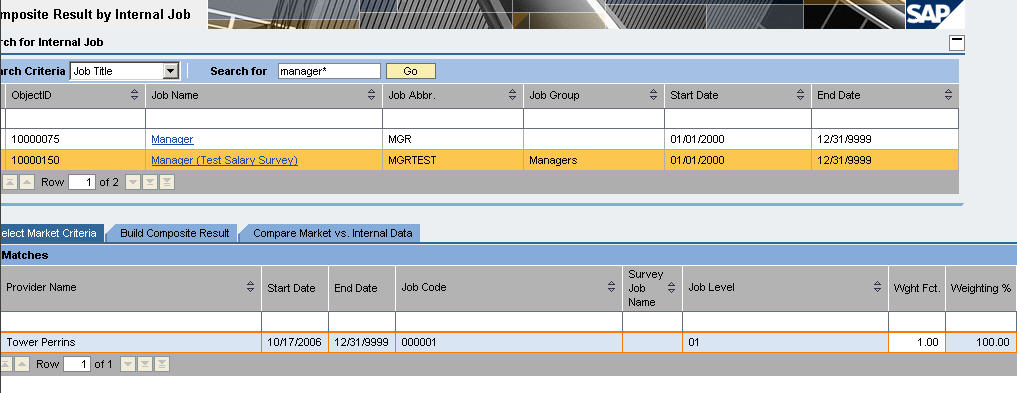
You first search for and select the job you will be creating the composite result against. Once selected, the bottom half will show you the match up you did earlier, in our example we had Tower Perrins be 100% weighting factor to this Manager job. At this stage you could still make adjustment to the weighting factor you did earlier, if needed.

Base upon that, now move to the "Build Composite Result" tab
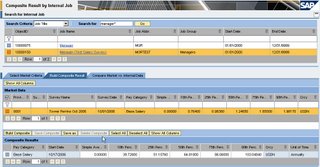

On this tab, the top portion shows the imported market data. Click on the "Build Composition", will take the aging, weighting factor, current value of the internal job and build a new composite result.

To see more columns click on the "Show All Columns" on the top portion will show up all of the columns you imported in the import step show in section II-C in Part I of this guide. If you click on "Show All Columns" in the bottom portion, you will see additional information on the internal job, such as job object ID, pay category, etc.,

Upon saving the information, it will write back to SAP R/3 to infotype 1271 on the job object. See below.
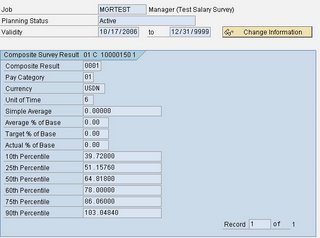

As you can see the value from two screenshots above (Portal view & SAP R/3 view), the value has been written to SAP.

Section VI: Create Mass Composite Result
- Similar to section V, this allow you to do to is at a mass volumn at once.

Section VII: Salary Structure Adjustment
- Compare the internal salary structure to the market salary structure and have it updated. If you recall, earlier when you uploaded the market data, it as for the salary min, max, and midpoint value.

You could read more on the help file (HERE).

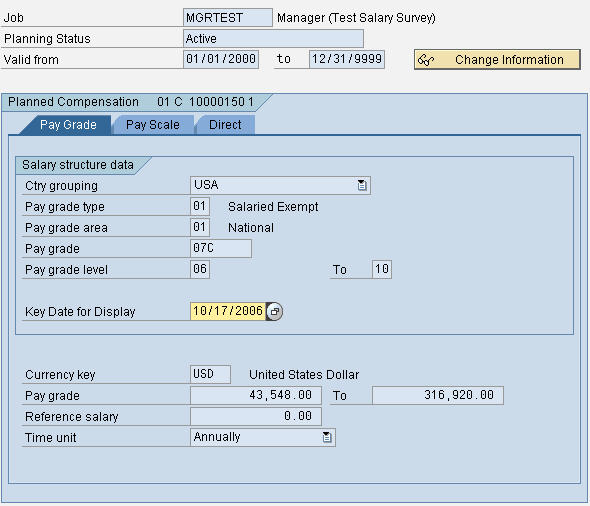
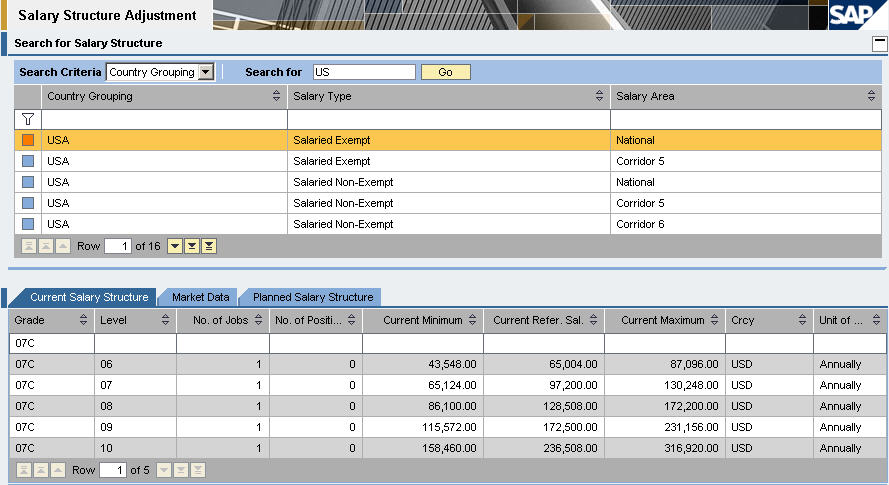
In our test job Manager we've created earlier, we have a plan compensation (infotype 1005) as followed.
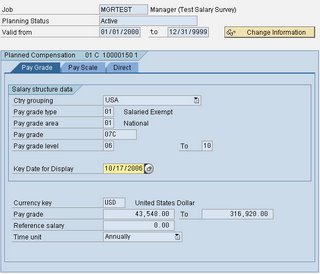

With that, on the portal side when using the Salary Structure Adjustment, you will see as such
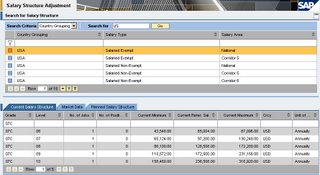

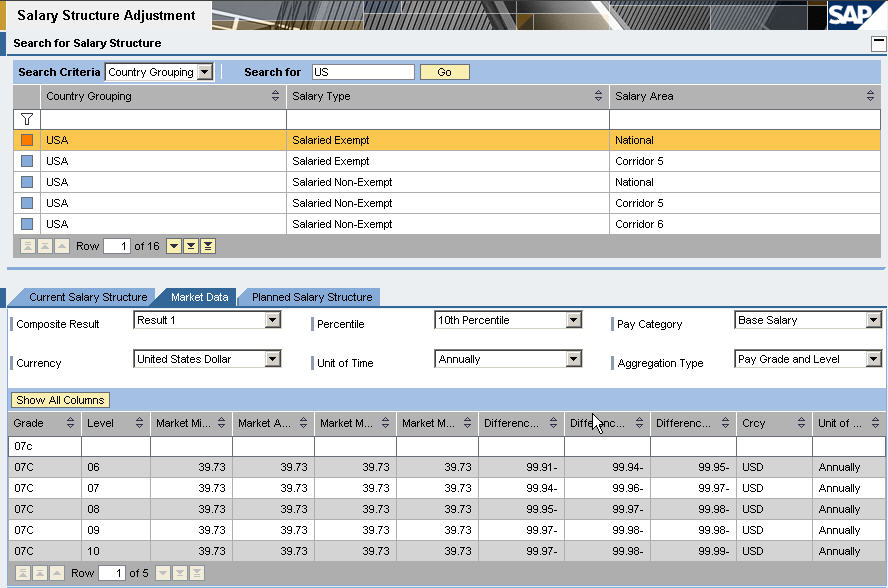
If you recall earlier, in our market data we've uploaded, there was a min, max, mid value used to upload. We've gone through the step of matching it to the internal job, determine the weighting factor, and just finished with creating the composite benchmark result for it.

With that, when you move to the Market Data table and search for the "grade", you will notice SAP has handled the calculation for you.
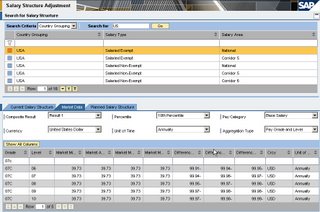
(Note: The numbers from screenshot above will be extremely off due to the low balling of the grade value in our test import data. )

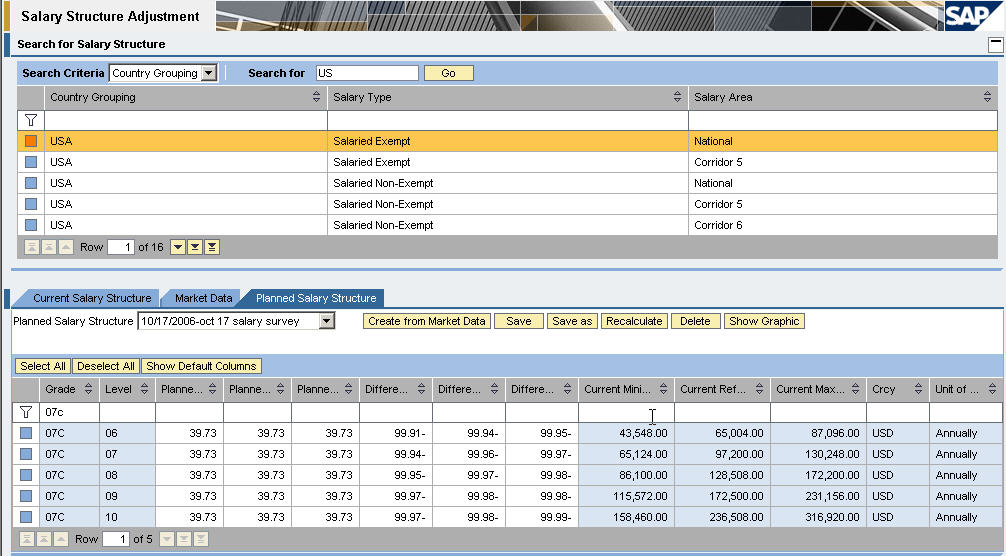
In the last tab "Planned Salary Structure", it will use the information aged, weighted, and matched to create a new salary structure for you.
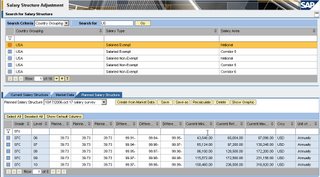

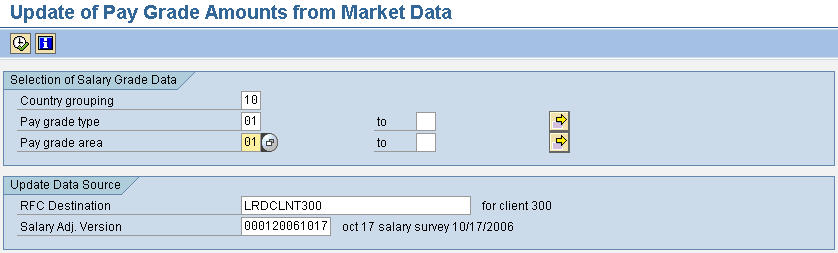
Once you click on save, it will save the information in "Planned Status". Once you've obtained the management approval for your research and market pricing, you will need to execute the program "Update of Pay Grade Amounts from Market Data" to activate the new structure.

In the SPRO IMG, follow the path to the location of the program

SPRO -> Personnel Management -> Enterprise Compensation Management -> Job Pricing -> Pay Grades and Levels -> Update Pay Grade Amounts From Market Data


(Important Note: When you are performing all of this functionality, you are doing it in the production environment, as the result the update will not be done to the production environment. Ensure you have a proper RFC connection back to your development client / gold client where you handle the configuration from. With that, the update pay structure will write back to the gold client. )

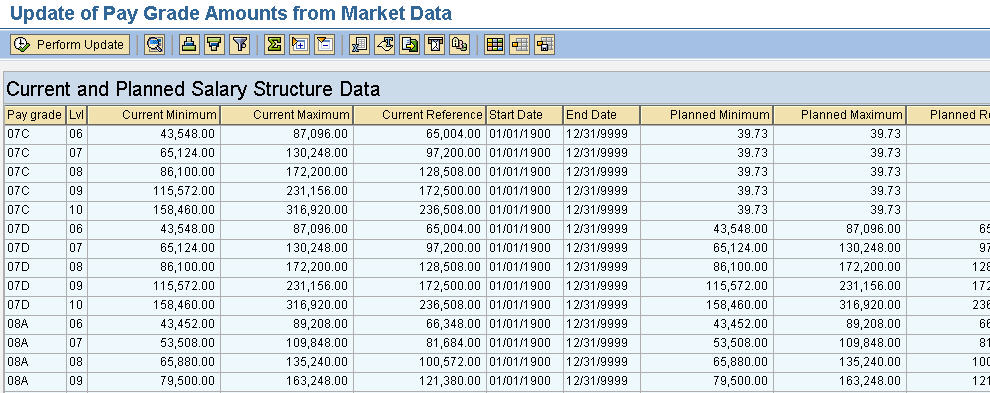
Upon executing the program, it will provide you with a report prior to handle the actual update.
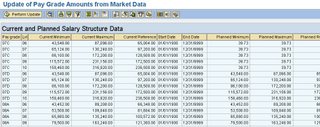

As you can see, it will show you the current value in the pay structure and the "TO BE" pay structure if the perform update is executed.

As a recommendation, it is better to execute up to this part only and save this information as a Microsoft Excel file. Do your finalizing offline and submit the excel sheet to the department handling configuration in your company. This would be the safer method and less heachache to deal with in terms of security in the production environment.

This conclude my two parts high level overview guide on SAP Job Pricing and Market Survey functionality. Feel free to comment on them and provide feed back on your experiences of it.

Cheers!
KN